We live in a fast-paced digital world where everyone wants instant gratification, from groceries and food to medicine. This urgency extends to platforms like OLX, where sellers aim to post ads quickly for buyers to make swift purchases. However, this speed and efficiency come with challenges and technical complexities. In the past, we have encountered various issues while trying to scale our backend systems, leading us to experiment with different tools and technologies to address these issues.
[TL;DR:] In this article, We will discuss, how OLX India scales their Infrastructure.
Let’s get started!
We here at OLX India, use the EKS cluster to host our workload. As someone experienced with EKS clusters, may recognize that scaling is a significant concern when managing large amounts of traffic. Hence, choosing the right tool and following the best practices and strategies can help optimize the overall performance.
Firstly, let’s walk you through how we handled EKS autoscaling in the past.
Cluster Autoscaler (CA)
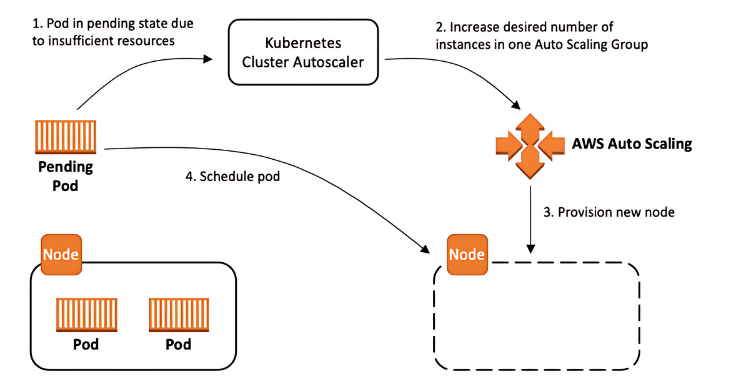
Cluster Autoscaling is a Kubernetes tool that increases or decreases the size of a Kubernetes cluster (by adding or removing nodes), based on the presence of pending pods and node utilization metrics. Cluster Autoscaler is configured with the EC2 Autoscaling group and it modifies your worker node groups so that they scale out when you need more resources and scale in when you have underutilized resources
Previously, we had multiple nodegroups as per the following needs:
- CPU/Memory/GPU Requirement
- Type of workload like critical/non-critical
We had configured different taint in nodes so that specific sets of pods would schedule to specific nodes.
However, the cluster autoscaler introduced its own set of problems, such as:
- Scaling can take time: The process of scaling up or down a cluster can take several minutes, depending on the size and complexity of the cluster. This may cause delays in responding to sudden changes in workload demands.
- Worker nodes with dependencies: If worker nodes have other dependencies or services running on them, the Cluster Autoscaler cannot remove them, even if they are not being utilized by the workload.
- Request-based scaling: The Autoscaler scales the cluster based on the resource requests of the pods running on it, rather than their actual usage. This can result in overprovisioning or underutilization of resources.
- Capacity Planning: The Autoscaler requires administrators to define the right size for new nodes, based on the workload requirements. If the new node size is too small or too large, it may not effectively optimize resource utilization.
- Volume Node Affinity Conflict: One major challenge we encountered with Cluster Autoscaler was its inability to schedule certain unscheduled pods. Upon further investigation, we discovered that stateful set pods required access to EBS Volume Storage. Persistent EBS Volumes in AWS have node affinity, which means the node accessing the volume needs to be within the same AWS zone. However, a node running stateful pods was terminated as part of the scheduled termination. When Cluster Autoscaler triggered the spawning of a new node, it occurred in a different zone, leading to a volume node affinity conflict and leaving the stateful pods unscheduled.
- Spot Termination: The Cluster Autoscaler uses the AWS Node Termination Handler to monitor for EC2 metadata service notifications. This requires an additional Daemonset to run on each node, which is an additional component that must be managed.
- Infrastructure Cost: The Cluster Autoscaler may not effectively save costs due to inefficient resource allocation, scaling delays, and the complexities of managing Spot Instances, which can lead to overprovisioning and increased expenses despite its optimization efforts.
After facing these problems with Cluster Autoscaler, we have decided to move to another solution that can overcome all the existing issues providing better scaling functionality and also help us to save cost.
And that’s where we found the tool called – Karpenter.
So let’s dive in …
What is Karpenter?
Karpenter is an open-source, flexible, high-performance Kubernetes cluster autoscaler built with AWS. It helps improve your application availability and cluster efficiency by rapidly launching right-sized compute resources in response to changing application load. Karpenter also provides just-in-time compute resources to meet your application’s needs and will soon automatically optimize a cluster’s compute resource footprint to reduce costs and improve performance.
Benefits of using Karpenter
Here are some advantages of using the Karpenter tool:
- Designed to handle the full flexibility of the cloud: Karpenter can efficiently address the full range of instance types available through AWS. Cluster Autoscaler was not originally built with the flexibility to manage hundreds of instance types, zones, and purchasing options.
- Node provisioning without groups: Karpenter manages each instance directly, without using additional orchestration mechanisms such as node groups. This allows you to retry in milliseconds instead of minutes when capacity is unavailable.
- Rapid Instance Turnaround: Karpenter boasts impressive speed in spinning up new instances, ensuring swift scalability. Karpenter bypasses the cloud layer of the autoscaling group to provision the instances directly, making the instances available faster for scheduling.
- Optimal Resource Utilization: One of the most significant advantages of Karpenter is its ability to optimize resource utilization. It can do this by automatically provisioning nodes based on application needs. This means that you can avoid overprovisioning, which can lead to wasted resources and increased costs.
- Customizable Scaling: Karpenter offers the ability to customize scaling behaviours based on your specific needs. You can configure scaling based on metrics such as CPU or memory usage, or you can use your custom metrics.
- Cost Savings: Because Karpenter optimizes resource utilization, it can lead to significant cost savings. By avoiding overprovisioning, you can reduce the number of nodes required to run your applications, which can result in lower cloud bills.
- Ease of Use: Karpenter is easy to use and deploy. It can be installed using Helm, and it integrates seamlessly with Kubernetes.
How to Get Started with Karpenter
Installation
There are different steps to get started with Karpenter. For installation, we will use Terraform and Helm Chart.
- Use Terraform to create an IAM role and IRSA for Karpenter
module "karpenter" {
  source  = "terraform-aws-modules/eks/aws//modules/karpenter"
  version = "20.8.5"

  cluster_name = module.eks.cluster_name # Existing EKS cluster name

  irsa_oidc_provider_arn          = module.eks.oidc_provider_arn
  irsa_namespace_service_accounts = ["karpenter:karpenter"]

  enable_irsa = true

  node_iam_role_additional_policies = {
    SecretsManagerReadWrite = "arn:aws:iam::aws:policy/SecretsManagerReadWrite"
  }

  create_iam_role         = true
  create_instance_profile = true
  node_iam_role_name      = "KarpenterNodeRole-${module.eks.cluster_name}"

  tags = {
    Environment = "${var.environment}"
    Terraform   = "true"
  }
}
2. Update aws-auth ConfigMap to allow the nodes that use the KarpenterNodeRole IAM Role to join the cluster.
3. Helmfile to deploy Karpenter and its components.
---
repositories:
- name: karpenter
  url: https://charts.karpenter.sh/
- name: incubator
  url: https://charts.helm.sh/incubator

helmDefaults:
  force: false
  atomic: true
  createNamespace: true
  cleanupOnFail: true
  verify: false
  timeout: 600
  wait: true

templates:
  default: &default
    missingFileHandler: Warn
    installed: true
    values:
    - helm/vars/{{`{{ .Release.Name }}`}}/values.yaml.gotmpl

releases:
# <--- Karpenter Component --->
- name: karpenter-crd
  namespace: karpenter
  chart: oci://public.ecr.aws/karpenter/karpenter-crd
  version: v0.32.0
  createNamespace: true

- name: karpenter
  namespace: karpenter
  chart: oci://public.ecr.aws/karpenter/karpenter
  version: 0.36.1
  <<: *default

- name: karpenter-nodepool
  namespace: karpenter
  chart: incubator/raw
  version: 0.2.5
  <<: *default

- name: karpenter-ec2nodeclass
  namespace: karpenter
  chart: incubator/raw
  version: 0.2.5
  <<: *default

# <--- Karpenter Component --->
With the help of this helmfile.yaml, we need to install
- Karpenter CRD
- Karpenter
- Nodepool
- EC2NodeClass
Karpenter & It’s Component Configuration
Let’s discuss these components below.
Karpenter CRD
Karpenter’s Custom Resource Definitions (CRDs) are essential for managing the dynamic provisioning and lifecycle of nodes in a Kubernetes cluster.
Karpenter
Karpenter runs a deployment inside the EKS cluster. Which is continuously monitoring unscheduled pods.
priorityClassName: system-cluster-critical

settings:
  clusterName: "avengers-eks-cluster" # replace with your cluster name
  interruptionQueue: "Karpenter-avengers-eks-cluster" # replace with your aws karpenter queue name

serviceAccount:
  create: true
  name: "karpenter"
  annotations:
    eks.amazonaws.com/role-arn: arn:aws:iam::123:role/KarpenterController-20240501170458327000000012

controller:
  resources:
    requests:
      cpu: 128m
      memory: 256Mi
    limits:
      cpu: 256m
      memory: 512Mi

nodeSelector:
  critical-addons: "true"

tolerations:
  - key: "critical-addons"
    operator: "Equal"
    value: "true"
    effect: "NoSchedule"
NodePool
When we first installed Karpenter, we set up a default NodePool. The NodePool sets constraints on the nodes that can be created by Karpenter and the pods that can run on those nodes.
resources:
  - apiVersion: karpenter.sh/v1beta1
    kind: NodePool
    metadata:
      name: compute-intensive-worker
    spec:
      template:
        spec:
          requirements:
            - key: kubernetes.io/arch
              operator: In
              values: ["amd64"]
            - key: kubernetes.io/os
              operator: In
              values: ["linux"]
            - key: karpenter.sh/capacity-type
              operator: In
              values: ["ondemand"] # We can use spot as well
            - key: karpenter.k8s.aws/instance-category
              operator: In
              values: ["c"]
            - key: karpenter.k8s.aws/instance-generation
              operator: Gt
              values: ["2"]
          nodeClassRef:
            apiVersion: karpenter.k8s.aws/v1beta1
            kind: EC2NodeClass
            name: compute-intensive-worker
      limits:
        cpu: 100 # this nodepool only create nodes upto 100vCpu
      disruption:
        consolidationPolicy: WhenUnderutilized
        expireAfter: 720h # 30 * 24h = 720h
NodeClasses
Node Classes enable the configuration of AWS-specific settings. Each NodePool must reference an EC2NodeClass using spec.template.spec.nodeClassRef. Multiple NodePools may point to the same EC2NodeClass.
resources:
  - apiVersion: karpenter.k8s.aws/v1beta1
    kind: EC2NodeClass
    metadata:
    name: compute-intensive-worker
    spec:
    amiFamily: AL2 # Amazon Linux 2
    role: "KarpenterNodeRole-20240501170458327000000012" # replace with your cluster name iam role
    subnetSelectorTerms:
        - tags:
            karpenter.sh/discovery: "${CLUSTER_NAME}" # replace with your cluster name
    securityGroupSelectorTerms:
        - tags:
            karpenter.sh/discovery: "${CLUSTER_NAME}" # replace with your cluster name
    amiSelectorTerms:
        - id: "${ARM_AMI_ID}"
        - id: "${AMD_AMI_ID}"
    #   - id: "${GPU_AMI_ID}" # <- GPU Optimized AMD AMI
    #   - name: "amazon-eks-node-${K8S_VERSION}-*" # <- automatically upgrade when a new AL2 EKS Optimized AMI is released. This is unsafe for production workloads. Validate AMIs in lower environments before deploying them to production.
Voila! 🎉 Now that you’ve successfully installed Karpenter, you’re all set to watch it in action as it optimizes your cluster. It will automatically scale up when needed and scale down when your workloads reduce.
At OLX IN, we have created different NodePool according to workload needs. For example
- Critical Addons – Use for critical add-ons like ingress controller/monitoring stacks/api gateway etc
- Gitlab Worker – Use for Gitlab runner, which we use for our CI/CD
- Spot Worker – Use for non-critical workloads like stateless applications and load test stacks
- On-Demand Worker – Use for critical applications or services which require high SLA
- GPU Intensive – Use for Datascience application and AI/ML batch jobs.
and many more Nodepool has been configure to handle workload requirement.
Karpenter Bonus! 🙂
Karpenter also has a built-in feature to support AWS Spot Termination. So we don’t need to manage an additional component, who will handle interruption for EC2 instance.
Features from Karpenter being used in OLX India
- Cost-Effective Node Management: Karpenter actively reduces cluster costs by identifying and removing empty nodes, consolidating workloads onto fewer nodes, and replacing more expensive nodes with lower-priced variants when possible.
After transitioning to Karpenter, we have achieved approximately a 30% reduction in our EC2 on-demand costs. This cost savings is primarily due to Karpenter’s ability to optimize EC2 workloads by intelligently assigning pods to nodes with available capacity.
- Proactive Interruption Handling: Karpenter monitors for potential interruptions (like health events or spot instance terminations) and automatically taints, drains, and terminates affected nodes in advance to minimize workload disruption.
We have successfully incorporated spot instances into both our production and non-production environments. Karpenter’s feature to handle spot instance termination events seamlessly has been instrumental in our ability to utilize spot instances effectively. This has enabled us to achieve significant cost savings while maintaining the reliability and performance of our applications.
- Resource Limit: The NodePool spec includes a limits section (spec.limits), which constrains the maximum amount of resources that the NodePool will manage.
We have implemented a variety of Node Pools within our infrastructure, and we intend to impose specific CPU limits on certain Node Pools. This restriction will effectively prevent any instances from launching beyond the designated thresholds, thereby enhancing our resource management and optimizing overall system performance.
Karpenter provides a lot of interesting features. You can follow the official document for more details.
Conclusion
Karpenter has proven to be an invaluable asset in our Kubernetes management toolkit, and here are some compelling highlights from our experience over the past two years:
- Feature-Rich Autoscaling: Karpenter stands out as a powerful cluster autoscaling tool, packed with features that enhance our operational efficiency. Its seamless integration with AWS EKS has made it a go-to solution for managing our Kubernetes clusters. The ability to automatically adjust computing resources based on real-time workload demands means we can focus on development rather than resource management. Hence, increasing our developer productivity.
- Effortless Node Recycling: One of the standout features we’ve leveraged is the ttlSecondsUntilExpired functionality. This innovative capability allows Karpenter to automatically recycle nodes without any manual intervention. By setting a time-to-live for our nodes, we ensure that they are efficiently managed and replaced when necessary, optimizing both performance and cost.
- Robust Community Support: Being backed by AWS, Karpenter boasts a large and active community of users and contributors. This vibrant ecosystem not only provides us with access to a wealth of resources and shared knowledge but also ensures that Karpenter continues to evolve with regular updates and enhancements.
In summary, Karpenter has transformed our approach to Kubernetes resource management, enabling us to scale efficiently while minimizing costs and maximizing reliability. It’s robust features and community support make it an essential tool for any organization leveraging Kubernetes on AWS.
Karpenter has been advanced to the Adopt ring in our OLX India Tech Radar column!
Thanks for reading the blog. Please share your feedback on the tool in case you have worked with Karpenter on your projects.
